This is the second part of our article about pizza. Part 1 covered traditional, very allergy-unfriendly New York pizza. Now we’re going to cover the basics of making allergy-friendly pizza, without wheat or cheese. We’ll need to break many of the rules established in part 1.
This recipe is designed to avoid the following allergens:
- Wheat (Gluten)
- Dairy
These are the most prominent allergens normally found in pizza. As always, read the ingredient list yourself to determine if this recipe has anything you’re allergic to.
As we covered in part 1, Michael Scott was onto something when he called pizza the great equalizer. But when you factor in two of the most common allergies – wheat and dairy – suddenly America’s favorite party food loses some of its appeal.
When my son was diagnosed with both of those allergies, it threatened to put an end to my quest to learn how to make pizza at home, if not eating pizza altogether. Fortunately, I didn’t have to. That’s partially thanks to Daiya, who makes a frozen pizza that is both vegan and gluten-free. There are other brands who offer similar options, but it’s almost impossible to find one that’s free of both wheat and cheese. Understandably so, since those are clearly two of the most important ingredients in pizza.
But of course, buying frozen pizza isn’t nearly as fun as making it yourself. And we’ve also found that we can’t always count on it being available at nearby stores. Plus, personally, I do prefer the vegan cheese made by Chao – and I also have no need for vegan pepperoni or sausage, which is usually what comes on the frozen ones. So I decided to figure it out for myself.
Now, I should probably set expectations. Pizza has a pretty complex gluten profile which owes a lot to the shaping process. And if there’s one area where gluten-free baking is lacking, it’s shaped doughs. And on top of that (literally), vegan cheese may have come a long way, but you’re not going to get the specific, characteristic flavor of that traditional blend of mozzarella and parmesan cheeses.
But if I may indulge in some nostalgia, I do think you can put together something that’s about as good as this:
I’m not sure how many of you remember Ellio’s pizza from your childhood, but I have to say that these things were incredibly popular on Long Island. That may seem paradoxical, considering the sheer quantity and quality of pizzerias on Long Island, but it’s true. I guess when you love pizza as much as Long Islanders do, there can never be too much of it. (And even though it’s one of the cheapest meals you can order out, with property taxes that high, you gotta save where you can.) Anyway, it obviously wasn’t great pizza, but even today there’s something special about it. It had this specific smell and flavor that was different from “real” pizza. Allergy-friendly pizza hits that same nostalgia button for me, so even though I usually don’t eat it myself, I know I must be doing something right.
Ingredients (for 2 pies)
Anyway, let’s get to the recipe. A few notes before we begin:
- The sauce recipe is identical to the one from my New York-style pizza recipe (which in turn is taken from here). There are no allergens in it, so there’s no need to change it.
- I’ve made the dough a few different ways. Essentially, I make it the same as allergy-friendly bread dough, with just a few slight tweaks. If there’s a bread recipe that works for you, give it a try. It’s the shaping of the dough that really matters here.
- While I personally don’t mind baking this on a stone/steel slab, I don’t know if I’d say it’s strictly necessary. You can get away with a baking sheet here.
THE SAUCE
- 28oz Crushed Tomatoes (1 big can or 2 small cans)
- 2 tsp Basil (dried & crushed)
- 2 tsp Oregano (dried & crushed)
- 2 tsp Garlic Salt (or, ½ tsp garlic + 1½ tsp salt)
- 1 tsp Paprika
- 1 tsp Sugar
- ½ tsp Onion Powder
- ½ tsp Ground Black Pepper
Mix all these ingredients together in a bowl. That’s it, that’s the recipe. Cover and refrigerate as long as you want. You can also freeze anything that’s left over after a few days; it keeps great.


THE DOUGH
- 440g (3 cups) Gluten-Free All-Purpose Baking Flour
- 330g (1¼ cup) Water (warm, about 100° F)
- 6g (1½ tsp) Yeast (NOTE: Most yeast is gluten-free but some aren’t, so double-check!)
- 60g (4 Tbsp) Sugar
- 30g (2 Tbsp) Olive Oil
- 14g (2 tsp) Salt
- 18g (4½ tsp) Xanthan Gum
TOPPINGS
- Olive oil
- Garlic (crushed or minced) – around 1-2 cloves per pie, depending on size
- Shredded vegan cheese (I like a blend of Chao Creamy Original, to approximate mozzarella, and Follow Your Heart Dairy-free Parmesan) — about 1½ cup per pie
OPTIONAL
- Coarse-ground Cornmeal (for dusting the pizza peel or other prep surface)
Instructions
Making the Dough and Sauce
I’ll be keeping these brief, since the dough recipe is similar to our standard bread recipe, and the sauce recipe is only 1 step anyway.
- Combine the dough ingredients as you normally would to make bread, preferably in a stand mixer. (See our bread recipe for more tips on using gluten-free flour to make bread dough.)
- Allow the dough to rest in an air-tight container for as long as you need to.
- Combine the sauce ingredients in a bowl. Cover and refrigerate.


Shaping the Dough
Here, we’ll be breaking pretty much every rule I wrote about in the standard NY pizza recipe. There’s really no way to shape the dough without using a rolling pin. And you actually may find it necessary to manually shape the outer crust.
- Dust 2 large pieces of parchment paper with gluten-free flour.
- Divide the dough into 2 balls as evenly as you can. Dust with GF flour as much as needed to keep it from sticking to everything. Place each dough ball on one of the dusted parchment papers.
- Dust the top of a dough ball with additional GF flour. Place a parchment paper on top of it and use a rolling pin on top of the parchment paper to flatten and shape the dough into a large disc. (If desired, you may also want to manually shape the outer rim of the disc to create a raised “crust”.)
- Lightly spray the dough with olive oil.
- Repeat for the other dough ball.
- Cover the flattened doughs with some form of air-tight plastic wrap. (I prefer to use proving bags, as you can easily slip them under the parchment paper and take advantage of their natural “puffiness” to prevent them from touching the dough.)
- Allow the covered doughs to rest for as long as you can. If any bubbles develop, it’ll be here.
Pre-heat the oven
- Since I usually make this in conjunction with regular pizza, I have the heat as high as it’ll go, but it’s possible something lower will work better for you. In any event, I probably wouldn’t have it any lower than 450° F.
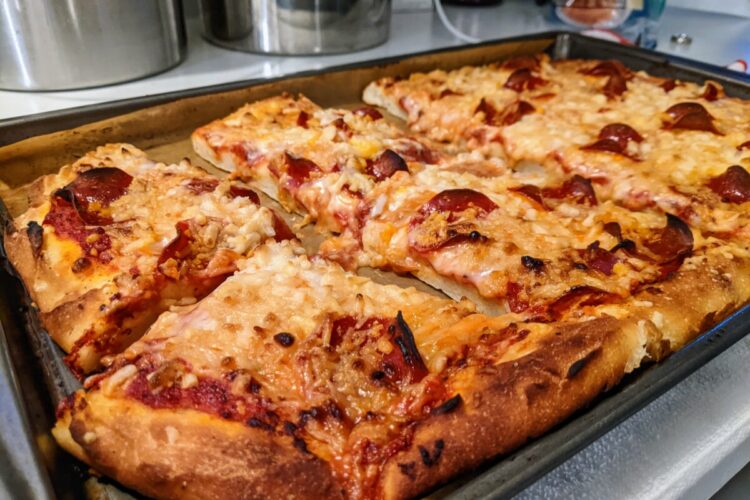
- This is also a good time to remove the cheese from the refrigerator. Unlike regular pizza, you want the cheese to be as warm as possible, because vegan cheese doesn’t melt nearly as easily as the real thing. (As you can see from the pictures, I have yet to truly perfect this myself. But I have definitely found that Chao melts better than Daiya.)
UPDATE: Actually, Daiya have recently changed their recipe to something oat-milk based that melts incredibly well! We highly recommend it. Also important to note, it uses certified gluten-free oats.


Assembling the pizza
Now, here’s the part of the process that’s almost identical to the normal pizza-making process, except for the ingredients used. It’s also slightly less important to keep the layers thin, since we aren’t quite so worried about preserving the structural integrity of the dough. It’s more down to personal preference.
- Olive Oil – Spread a thin layer of olive oil across the top of the dough. (I like using a silicone pastry brush, but you could use a spray bottle, or even your fingers.)
- Garlic, Salt & Pepper (optional) – Distribute a modest amount of crushed garlic, as evenly as possible, across the dough. A little bit of salt & pepper can be nice here too. Just remember that these are also in the sauce, so go easy.
- Sauce – Add sauce, one ladle-full at a time.
- Toppings, part 1 – If you’re using any toppings other than cheese, add some of them at this stage, before the cheese. The cheese will help them stay on. (I would say to add no more than half at this point, but really it’s probably just a matter of preference and depends on exactly what topping you’re using. Figure out what works best for you.)
- Cheese – Sprinkle the cheese evenly across the pie.
- Toppings, part 2 – Add your final layer of toppings, if needed.

Baking the pizza
Unlike the regular pizza, we aren’t going to be delicately sliding this directly onto a baking surface in the oven. You can either slide your pizza peel under the parchment paper and easily transfer it into the oven, or place it on a baking sheet. Either way, I would give it somewhere around 10-20 minutes, depending on how hot the oven is. (If you want to get really finicky, the best combination for us is: oven at 550° F, pizza on top of parchment paper, on top of a light-colored baking sheet, on top of the baking steel, for 10 minutes. The light color helps the crust not to burn, but it still gets pretty crispy, and the cheese gets a chance to melt. But doing it on a regular baking sheet and a lower temperature is fine too, it will just take longer.)
And that’s it! I hope this recipe is at least a good starting point for any kind of allergy-friendly pizza you want to make. Let us know if you come up with your own spin on it!

Allergy-friendly New York-style Pizza
Equipment
- Stand mixer (optional, but very helpful)
- 3 Parchment paper
- 2 Proving bags (optional, but very helpful)
- Rolling Pin
- Baking sheets and/or Baking stone/steel
- 1-2 Pizza Peels (not necessary if using baking sheets)
Ingredients
Sauce (makes a bit more than you need)
- 28 oz Crushed Tomatoes
- 2 tsp Basil dried & crushed
- 2 tsp Oregano dried & crushed
- 2 tsp Garlic Salt or, ½ tsp Garlic + 1½ tsp Salt
- 1 tsp Paprika
- 1 tsp Sugar
- ½ tsp Onion Powder
- ½ tsp Black Pepper ground
Dough
- 440 g Gluten-Free All-Purpose Baking Flour 3 cups | not "1-to-1" or "measure for measure"
- 18 g Xanthan Gum 4½ tsp
- 6 g Yeast 1½ tsp
- 330 g Water 1¼ cup | warm, about 100° F
- 60 g Sugar 4 Tbsp
- 30 g Olive Oil 2 Tbsp
- 14 g Salt 2 tsp | table salt
Toppings
- 3 cups Shredded Vegan Cheese
- Olive Oil brushed or sprayed
- 2-4 cloves Garlic minced or crushed
Other
- Cornmeal for dusting
- Gluten-Free Flour for dusting
Instructions
Make the dough
- Add warm water (330g), yeast (3g), and a dash of sugar to the mixing bowl (of a stand mixer). If using active dry yeast, let stand for about 5 minutes while you continue the other steps.
- In a separate bowl from the wet ingredients, combine all dry ingredients: GF flour (440g), xanthan gum (18g), sugar (60g), and salt (14g). Gently stir just a little bit to incorporate the ingredients together. (Xanthan gum has a tendency to "poof" into the air when disturbed.)
- Add dry ingredients to the water & yeast mixture in the mixing bowl (which should be bubbling/foamy).
- Add olive oil (1 Tbsp) to the mixture.
- Start up the stand mixer, beginning on the lowest speed to avoid kicking up a cloud of flour. Then crank it up a notch or two.(This isn’t as precise a process as mixing wheat dough, where you have to use a light touch to avoid overworking the dough, not to mention the mixer itself.)
- As needed, pause the mixer to scrape the sides of the bowl and the beater with a rubber spatula dipped in water. Repeat until everything looks sufficiently combined.(I usually keep a small bowl of water for dipping throughout the process; you’ll need it in the next few steps as well.)
Shaping the dough
- Dust a work surface with GF flour. Remove the dough from the mixing bowl and place on the work surface. Divide the dough into 2 balls as equally as possible. Dust with additional GF flour as needed.
- Dust 2 pieces of parchment paper with GF flour and cornmeal. Place the dough balls on the pieces of parchment paper.
- Dust the top of one of the dough balls generously with GF flour. Place a third piece of parchment paper on top of it. Use a rolling pin to roll the dough out to the desired size & shape. If desired, roll up the outer rim slightly by hand to create a raised "crust".
- Repeat the above step for the other dough ball.
- Cover the rolled dough with something air-tight, preferably proving bags.

- Allow the doughs to rest at room temperature for several hours if possible. They should puff up slightly.

Sauce
- Combine all sauce ingredients in a small bowl. Cover and refrigerate.
Pizza Assembly & Baking
- Remove the shredded vegan cheese from the refrigerator if necessary.
- Pre-heat the oven to 450° F or higher. (If using a baking stone or steel, make sure it's in the oven at this time.)
- Brush a thin layer of olive oil on the shaped dough.
- (OPTIONAL: Add a sprinkling of crushed garlic, salt & pepper.)
- Ladle some sauce onto the dough and spread it into a thin layer.
- (OPTIONAL: Evenly distribute about half of any non-cheese toppings you're using.)
- Sprinkle cheese onto the dough.
- (OPTIONAL: Add the remaining toppings.)
- Using a pizza peel or baking sheet if desired, transfer the assembled pizza(s) into the oven. (Baking sheets make it easier to do both at once.)
- Cook for somewhere between 10-20 minutes. Check for doneness starting around 10. (Vegan cheese doesn't melt as easily as regular cheese, so the crust is more likely to burn first than the cheese.)
- Remove the pizza(s) from the oven. Transfer to a cutting board. Let it sit for a few minutes, then slice and serve.
[…] This article about pizza is going to be split into 2 parts. The first part is a departure from what this site usually covers: I’m going to talk about traditional, very allergy-unfriendly New York pizza, with plenty of gluten and cheese. But I knew I had to get that right before making the allergy-friendly version. See part 2 for that. […]
[…] with our gluten-free pizza, I started with our allergy-friendly bread recipe as a baseline. Then, instead of barley malt, I […]