DISCLAIMER: I may earn a small commission for my endorsement, recommendation, testimonial, and/or link to any products or services from this website.
This recipe is designed to avoid the following allergens:
- Wheat (Gluten)
- Egg
- Dairy
These are the most prominent allergens normally found in bread. As always, read the ingredient list yourself to determine if this recipe has anything you’re allergic to.
Like a lot of people, I’ve recently been learning how to make bread. This was actually a pre-pandemic goal of mine, but it started feeling like an especially useful skill when bread went missing on all the grocery store shelves. At least, it did until we ran out of bread flour and couldn’t find any of that on store shelves either. Ultimately, pre-packaged bread became available again before bread flour did, and the baking honeymoon was over.
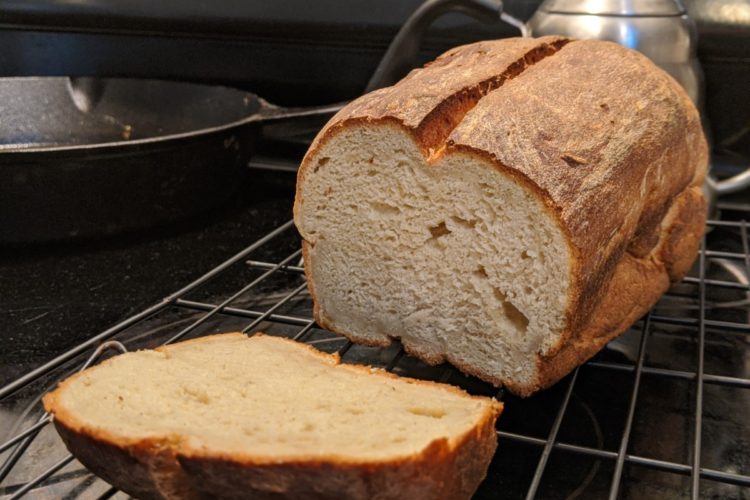
Even so, there’s no questioning the appeal of homemade bread. It’s ultimately cheaper (not massively, but there’s some savings there), it makes the house smell amazing, and the freshness is to die for. (As long as you can eat it all before it goes stale, which can be a real problem, though not for lack of trying.)
What does take away a lot of the appeal, though, is a wheat allergy or gluten intolerance. And even though there are many wheat-free options on the market these days, many of them compensate by adding dairy or eggs. So if you’re dealing with the wheat/egg/dairy allergy triple threat like we are, it’s a real pain, if you’ll pardon my French.
We have found one brand that usually checks all the boxes (Schär) and we try to always have some of that on hand. But does that mean no more home-made bread?
I wasn’t ready to take “no” for an answer.

I studied a few different recipes; some gluten-free (but not dairy or egg free), others vegan (but not gluten-free). They often felt pretty complicated, as opposed to the beautiful simplicity of classic home-made white bread. I wanted to make it simpler, so I tried to imitate my favorite white bread recipe as much as possible. (I’ll go ahead and link that recipe too: LilLuna.com)
Here’s what I came up with.
Ingredients
- 3 cups (440g) Gluten-free All-purpose Baking Flour
- 1½ cups Water (warm, about 100° F)
- 4 Tbsp (60g) Sugar
- 1 Tbsp Oil (olive oil preferred)
- 3 tsp (21g) Salt (fine table salt)
- 4½ tsp (18g) Xanthan gum
- 1½ tsp (6g) yeast (active dry)

Notes
- See our primer on gluten-free flour if you’re not sure what you need. The one I’ve used more than any other is Bob’s Red Mill All-Purpose Gluten-Free Baking Flour. This is NOT the same as “1-to-1” GF flour, so be careful. (Seriously, read our article linked above article if you haven’t — it explains everything!)
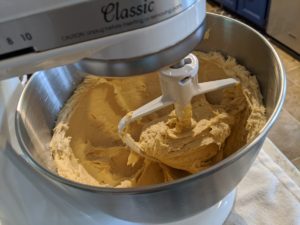
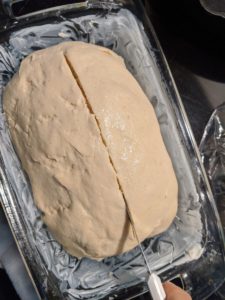
- If you’re used to making wheat bread (or any standard dough), you’ll need to un-learn some of the normal rules of baking. Most wheat dough is first made into a large ball that’s just dry enough to knead and roll around by hand. Then it’s risen for a few hours, then punched down, then shaped, then proofed. But gluten-free dough needs to be a lot stickier, and it requires only a single rise, after shaping. So you’ll need to do all of the shaping before the rise, and you’ll need to aim for a consistency more like cake batter than bread dough. But, if you do it right, it will rise like you’d expect.
- A stand mixer is definitely recommended here. It can still be done without one, but it will be more difficult than wheat bread due to the different, less “knead-able” consistency. I’ve used both the dough hook and paddle attachment, and I think I prefer the paddle, but they both work. The dough hook isn’t really necessary because this dough never gets solid enough to require that extra push/pull action.
- I will say up front that it’s a challenge to make this quite as flavorful as wheat bread. To that end, I recommend using olive oil rather than vegetable oil. Either one will work, but you want all the flavor you can get. (I also use a little more sugar than is strictly necessary.) I’m definitely planning on using this as the base for a cinnamon raisin bread or some other flavor eventually, as they’d probably end up tasing more similar to their wheat-based counterparts.
- Why do I recommend both vegan butter for greasing the pan and an oil spray for the top? Well, I’ve tried both, and I’ve found that the vegan butter just seems to work a little better for the pan. It makes it easy to get the bread out of the pan without making it too wet.
- I’ve gotten used to using “active dry” yeast. If you prefer a different type of yeast, it’ll probably work fine. I just haven’t really tried them much, so the recipe will be written with active dry yeast in mind. I keep a jar in the fridge because it’s cheaper to buy it that way and I can use however much or little I need for each recipe. If you use a packet, which is usually 2.25 grams, I’d suggest using half of it.
Allergy-friendly Bread (Gluten-free and Vegan)
Equipment
- 1 Stand mixer optional
- 1 Bread pan
Ingredients
- 3 cups Gluten-free All-purpose Baking Flour 440g
- 1½ cups Water 350g | warm (about 100° F)
- 4 Tbsp Sugar 60g | fine grain
- 1 Tbsp Oil 15g | olive oil preferred
- 3 tsp Salt 21g | fine table salt
- 4½ tsp Xanthan gum 18g
- 1½ tsp Yeast 6g | active dry or instant
Instructions
Make the dough
- Add warm water (1½ cup), active dry yeast (1½ tsp / 6g), and a dash of sugar to the mixing bowl (of a stand mixer). Let stand for about 5 minutes while you continue the other steps.(If using a different type of yeast, follow the instructions on the container. The main difference is usually just whether you have to activate it in water or not.)
- In a separate bowl, combine all dry ingredients: GF flour (440g), xanthan gum (18g), sugar (60g), and salt (21g). Gently stir just a little bit to incorporate the ingredients together. (Xanthan gum has a tendency to "poof" into the air when disturbed.)
- Add dry ingredients to the water & yeast mixture in the mixing bowl (which should be bubbling/foamy).
- Add oil (1 Tbsp) to the mixture.
- Start up the stand mixer, beginning on the lowest speed to avoid kicking up a cloud of flour. Then crank it up a notch or two.(This isn’t as precise a process as mixing wheat dough, where you have to use a light touch to avoid overworking the dough, not to mention the mixer itself.)
- As needed, pause the mixer to scrape the sides of the bowl and the beater with a rubber spatula dipped in water. Repeat until everything looks sufficiently combined.(I usually keep a small bowl of water for dipping throughout the process; you’ll need it in the next few steps as well.)

- Grease the bread pan with a stick of vegan butter (preferred) or oil spray. Use a paper towl to wipe it so it’s not overly wet.
- Use the rubber spatula to add the dough to the pan. You don’t have to do it all in one shot, and in fact it can be helpful to do it a little at a time to help with shaping the dough. It may also be helpful to dip the spatula in water each time you use it, to keep the dough from sticking to it. The water may also help you to shape the dough and make it look pretty, if you feel the need.
- Lightly spray some plastic wrap with oil and cover the pan.
Rest
- Let it rise for 2-3 hours in a warm, dark place.(If you can't figure out a warm, dark place, just turn your oven on at its lowest setting for a minute or two.)

Bake
- Assuming the dough has puffed up significantly by now, pre-heat the oven to 425 F.
- If desired, "score" the the bread by lightly dragging the tip of a sharp knife across the top of the loaf.
- Bake for 25-30 minutes. You’ll know it’s done when the top is looking significantly browned, just to the point of looking like it might start to get burned.
- Remove from the oven. You could turn it out onto a cooling rack immediately, or you could wait a little longer. As noted above, the outside does tend to brown easily, so you may favor giving the inside a little more time in the moderate heat to dry out. Some actually recommend leaving it in the oven, turned off, with the door open as the heat dissipates. Since I have toddlers, I’ve opted to, uh, not do that. But you could leave it in the pan for about 15 minutes for a similar effect. I wouldn’t go much longer than that, though, because it could start to get a soggy bottom.
- Let it cool as long as you can before slicing it, as gluten-free dough tends to be gummy for a while after baking. If it’s allowed to cool down longer, it will have a more bread-y texture.
Have tips, tricks, advice, or questions? Feel free to leave a comment below. Buen provecho!
Hi, your recipe looks just like what I am looking for–thanks for sharing. I don’t have a stand mixer where I am now, so I was wondering about how long I would need to hand mix the batter? Also, does it need to be kneaded? I am not a bread maker, so I just want to clarify before attempting your recipe. Thanks!
Hi there! I have had to do it without a stand mixer once, sort of. I was adapting it into a pretzel recipe (which will be posted here some day), which does have a few other elements like honey, vegan butter, and almond milk, but the base of it is pretty similar. I was making too large a quantity for it to fit in the stand mixer, so I did mix it manually, with a wooden spoon. It was a little messy, but it did work. You’ll definitely need to use the rubber spatula to scrape it off the spoon every now and then. But one way or another, it’ll come together eventually.
Unlike regular bread dough, you don’t really need to “knead” this in any sense. It’s much more similar to cake batter (probably a bit thicker, though). Truth be told, I’m not entirely sure how long you need to mix it; once everything is combined and you don’t see any more dry flour bits in there, it’s probably done. I don’t think it’s possible to *over* mix, though, so I usually err on the side of too much.
In regular bread making, the act of kneading (and the possibility of doing it too much or too little) is all about working the gluten in a certain way, forming bonds inside the dough and getting it to this very specific consistency where it’s all bubbly inside but kind of rubbery outside. None of that applies here. In fact, a common mistake I made in earlier attempts at gluten-free baking was to try to achieve that same consistency before baking: soft on the inside without being sticky to the touch on the outside. The finished result was always extremely dry. You really do want it to be a sticky batter that you scoop into the bread pan, possibly not all at once. This does make it quite a challenge to make more intricately shaped breads such as pretzels and bagels… but I’ve found it *is* possible. (More on that later!)
Please let us know how it turns out; we’d love to see it!
[…] you mix in some Old Bay hot sauce. It also works great for French toast when we have some leftover allergy-friendly bread to […]
I love the recipe and have used it several times but my only issue is the bread never rises as your photo shows. What could I be doing wrong ?
I’m so glad to hear that people are using the recipe — so glad that I’m tempted to avoid answering your question. Because the truth is, I was just wondering about this literally yesterday, when I tried making the bread and it simply did not rise. I’ve been trying for a while to rework the recipe, maybe use different blends of flour, maybe use psyllium husk, etc. and for some reason, lately, it just hasn’t been going as planned.
So I would love to tell you the secret, but unfortunately, I’m just as stumped as you are. But now I’m extra determined to figure out what’s going wrong so I can answer the question once and for all. I hope I can report back to you with some good news!
One thing I know I should try is simply going back to basics and following the recipe *exactly*, using no shortcuts. To be honest, once I’m done writing the recipe, taking pictures, etc. I inevitably start cutting corners and dumping all the ingredients together so there’s less cleaning to do. Perhaps I’ve gotten careless.
To get even further into the weeds… I actually was having similar issues with wheat bread for a while. It just didn’t seem to be rising the way it used to. At some point in the last year I actually made the switch to sourdough bread, and that has been going pretty great. This does make me wonder, however — and this is really some pretty wild speculation, I’ll admit — if somehow, there’s an issue with store-bought yeast going on. We all know there was a supply issue back in 2020, so it wouldn’t be the craziest thing if something has gone wrong in the supply chain and store-bought yeast, at least from the brand I usually use, just ain’t what it used to be. I admit this is a pretty spotty theory, since I’ve noticed no issues activating the yeast — it seems about the same as I remember, at that stage. However, just for the heck of it, I might try switching to a different brand and seeing what happens. I already ditched one canister and started with a fresh one, but that didn’t seem to do the trick.
I’ve got potentially good news! This week I bought a different yeast and made sure to follow the recipe as carefully as possible, and I finally managed to achieve that rise again.
Here are the main things I focused on. I’m going to keep experimenting to narrow down which one was the real difference maker, but there’s a good chance it’s the first one:
1. I used a brand new pack of Red Star active dry yeast — a single packet — rather than taking some from the jar of Fleischmann’s that I have in the fridge. Ultimately I’m still hoping to get a good jar and keep it well, because the packets are a little inconvenient sometimes. But a totally fresh packet obviously has the best chance of working, and it did. I’ll try to post a picture of the exact one I used.
2. I made *absolutely* sure to check the water temperature so it was between 100° & 110° F. Also, it was water I had boiled a while earlier (to make tea & coffee) rather than hot from the tap. I don’t know if that matters, and it’s a bit inconvenient if you don’t plan on it — but figured I should mention it.
3. I took extra care to really mix all the dry ingredients together in a separate bowl, before adding to the water + yeast mixture. (And then the 1Tbsp of oil goes in last.)
So really, I have a feeling the yeast was the issue, but it’s possible some of the other things helped too. I hope it helps you as well. Let me know!
I’m not sure of the best way to add photos here, but hope these work — here’s the yeast I used:
https://sofritoandsons.com/wp-content/uploads/2022/12/PXL_20221209_180525337.jpg
And here’s how the dough rose (it was nowhere near the top of the pan originally)

And the final result:

I still check back on here sorry I haven responded sooner haha. I am gong to try today I kind of gave up but im determined to get this bread back for my kids !
Glad to hear it! We’ve actually been experimenting with gluten-free sourdough bread lately. It’s no magic bullet; it comes out better when I add a pinch of store-bought yeast and some sugar, so I’m not sure how much I can really call it “sourdough” at this point. I also think Bob’s Red Mill rises better than King Arthur, but KA tends to be easier for me to get so I’ve been sticking with that. We’ll see if it turns into something worth posting about. But do let us know how it goes the next time you try!
[…] made the dough a few different ways. Essentially, I make it the same as allergy-friendly bread dough, with just a few slight tweaks. If there’s a bread recipe that works for you, give it a […]
[…] with our gluten-free pizza, I started with our allergy-friendly bread recipe as a baseline. Then, instead of barley malt, I went with molasses. It’s the most similar […]