This article about bagels is going to be split into 2 parts. The first part is a departure from what this site usually covers: I’m going to talk about traditional New York bagels, which contain wheat and barley (and sometimes also egg). But I knew I had to get these right before making the allergy-friendly version. See part 2 for that.
As I mentioned in our article about pizza, the food I was raised on was not so much “Italian food” as “New York food”; which, while largely dominated by (southern) Italian cuisine, includes a few other very crucial cuisines. Few foods are more strongly identified with New York than bagels, which are of Jewish/Polish origin.
The mythology surrounding NY bagels has a lot in common with that surrounding NY pizza. Their reputation is well-earned, and I take some amount of pride in it (funny how you can take pride in something you had absolutely nothing to do with). But when I moved from NY to North Carolina, I had no choice but to explore the possibility that it’s possible to make great bagels anywhere. (And don’t talk to me about Montreal or whatever. I’m sure they’re great, I’m just not interested.)
Much like with pizza, even in NY, there’s a big quality gap between chain/grocery store bagels and “bagel place” bagels. And even then, some “bagel places” are clearly better than others. (Funny how that can happen when they’re both using that legendary “New York water”!) The main difference in NC is that there simply aren’t as many “bagel places”. There are some, and they’re very good — on a scale of 1 to 10, I’d rank them about an 8. But they’re also at least a half hour drive away from my house, and often very crowded on the weekends. So I finally decided to do something I’d been contemplating for a while: making my own bagels.

There are a few crucial factors that go into making true NY-style bagels:
- Boiled and baked. Let’s start with the most obvious, but necessary, observation — just in case you’re new to bagel-making. If you don’t boil it, it may still turn out delicious, but it won’t be a bagel. It just won’t. Bagels aren’t exactly bread, but they’re not exactly baked goods either. (Pretzels share a similar status.) They have a really unique texture. There’s a certain dense, bubbly, springy, glossy quality that only seems to come about through boiling.
- Barley malt. The next most important thing, in my opinion, is the use of barley malt. You can get pretty close to a good bagel without it — substituting something like brown sugar, honey, or molasses — but if you don’t use malt, your house won’t smell like a bagel shop. More importantly, the texture won’t be all the way there. It does a great job of feeding the yeast, like sugar, but it’s also got a distinct and unique savory edge to it. It’s important in both the dough and the boiling water bath. You can either use syrup or powder, though generally “diastatic” powder is recommended in the dough itself (it’s much easier to work with) and syrup or “non-diastatic” powder is recommended in the water bath. (Google the science of it if you want; I’ve read about it, but I couldn’t explain it to you.)
BattlestarHigh-Gluten Flour. The above two tips are the most crucial by far, but the next thing we need to talk about is the flour. For bagels, the more gluten, the better. All-purpose is a non-starter (unless you’re making a naan starter, thank you I’ll be here all week folks), bread flour is better, “high gluten” is best. It helps the dough retain its shape throughout the whole resting, boiling, and baking process without getting all dry and stiff. Perhaps more importantly, a bag of high-gluten flour usually has a picture of bagels on it, so you know it’s legit.- The hole. One key thing about a true NY bagel, to me, is that the hole isn’t actually all that wide. There are definitely other New Yorkers who would disagree with me on that point, and prefer a wider one. But I feel like the only purpose of the bagel hole is to help it cook a certain way. It just stops it from being a roll. It needs to be there, but there’s no reason for it to be big. All that does is make it harder to put toppings on it. Especially if you’re planning on making a bagel sandwich.


Now let’s get into the ingredients. Aside from the malt, they’re nothing too special – it’s all in how you use ’em. Feel free to adjust the quantity however you see fit. In the recipe, I’ll get into some details about why the proportions are important.
I’ve also gotta give some credit to this guy — his video was really helpful regarding the “poolish” and the rolling technique. And it’s also just so very New York.
Ingredients (makes 6 large bagels)
For the Sponge
- 170g Water, room temperature (¾ cup)
- 170g Flour, high gluten content (about 1½ cups)
- ¼ tsp Yeast (about 1g, but our scale doesn’t get more accurate than that)
For the Dough
- 170g Water, room temperature (¾ cup)
- 400g Flour, high gluten content (about 2½ cups)
- ¾ tsp Yeast (about 3g)
- 8g Diastatic Malt Powder (2 tsp)
- 16g Salt (2 tsp)
For the Water Bath
- about 3 Quarts of Water (adjust as needed for your pot)
- 1 tsp Salt
- 2 Tbsp Malt Syrup or Non-Diastatic Malt Powder
- 2 Tbsp Baking Soda
As with any dough recipe, there are a few different ways to achieve the same result. You can play around with the rise time/temperature, shaping it before or after refrigeration, etc. I’m going to describe what works best for me, with brief references to other things I’ve tried, but you can adjust your approach as needed.

In my approach, phases 1 & 2 occur the day before, and phases 3 & 4 happen in the morning.
PHASE 1: Create a “sponge” or “poolish” (optional, but highly recommended)
- Combine a quarter of the yeast from the full recipe with half of the water from the full recipe and an equal weight of flour, in a fairly small container, with room to potentially double. (For my half-dozen, I use ¼ tsp yeast, 170g water, 170g flour.) If it works for you, you can even use the same container you’ll be mixing the rest of the dough in later.
- Lightly cover the container – not air-tight, but don’t let flies in. (You can tie or rubber-band a paper towel on top of your container, or something fancier if you prefer.)
- Let it sit at room temperature for about 8 hours. (Obviously there will be some variation depending on the ambient temperature. What you want is for it to become very bubbly and puffy at the top, without going too far and starting to deflate.)


PHASE 2: Mix the dough
- Transfer the sponge to a larger container/bowl if necessary.
- Add the rest of the water, flour, & yeast from the recipe. Stir slightly to get the yeast incorporated.
- Add the diastatic malt powder and salt.
- Combine the ingredients using a dough whisk, stand mixer, or just your hands.
- Knead the dough thoroughly. This should take a bit longer than it takes with normal bread dough because the hydration is relatively low, so it takes more work to get out all the dry spots. When you’re done, the dough should be slightly tacky to the touch (sort of like Play-doh) but not really “sticky”. It should hold its shape very easily.
- Cover the dough in an air-tight container with enough room for doubling. (You don’t necessarily want it to double just yet, but it’s always good to have room for it.)
- Refrigerate overnight.


NOTE: Another option is to go through a faster rising process (1-2 hours in a warm place) and shape the bagels, then refrigerate them overnight. This can yield excellent results, but I’ve found it to be pretty tricky and ended up with flat bagels; more practically, it’s also really hard to find space in the fridge for a whole sheet of bagels that can’t touch anything else. Ultimately I find my chosen method less stressful, but do whatever works for you.
PHASE 3: Shape the bagels
NOTE: You’ll probably want to start “Phase 4” simultaneously with this one, meaning you can start pre-heating your oven, boiling the water, and preparing the ice bath.


- Remove the dough from the fridge. You may want to give it some time to sit and come up to room temperature, but you don’t necessarily have to.
- Prepare a sheet of parchment paper by dusting it with some coarse semolina flour (if you have it, otherwise whatever flour you’re using).
- Very lightly dust a portion of your work surface (preferably a countertop) with flour. You don’t want it too heavy, just enough that you can reach for some if you need it. (Flour isn’t really conducive for rolling dough, but sometimes a tiny bit of it will help you get out of a sticky situation.)
- Cut the dough into however many pieces you want. Each piece, of course, will become a bagel. Keep them as equal as you can, but don’t obsess over it; it’s okay if they’re a little different. (My recipe will make 6 large NY-style bagels, but some people prefer smaller ones.)
- Take 1 piece of dough and use the palms of both hands to roll it out into a rope, starting at the middle and working your way outward. You’ll want it to end up roughly 3 hand widths long.
- Wrap the rolled-out rope around your hand so that the ends meet somewhere in your palm. Twist them a little if you’d like.
- Firmly press your palm down onto the counter and rock it back and forth to press the ends of the dough together. Make sure it really comes together; if there are still 2 discernable “ends”, they’re likely to come apart when boiling.
- Slide the shaped dough off your hand. It should look a little bit taller & thinner than you’d expect, more of a “ring” shape. But that gives the dough some room to puff outward and form the shape you’re looking for. That will also narrow the hole, so it should look a bit larger than desired at this point. (If the hole looks too small, you should still be able to stretch it a bit with your fingers at this stage – or even right before boiling.) Place the dough on the dusted parchment paper.
- Repeat with the other dough pieces.
- Cover the bagels & parchment with a proving bag or a damp towel. Let them rest for at least 15 minutes, but possibly more like 30. This will depend on the temperature somewhat.


NOTE: There’s another way of shaping the bagels, which I used to swear by, but I’ve come to prefer the rolling method. You could shape each dough piece into a ball, then poke your thumb through the center and “swing” it around your thumb to widen the hole. This does avoid any issues with the ends coming apart later, but I find I get more height with the rolling method. Do what works best for you.

PHASE 4: Boiling & Baking
- Pre-heat oven to 450° F, ideally with a baking stone or steel inside. You can use a baking sheet as well, it’s not as critical as it is with pizza, but I am a fan of the steel. (You may want a higher temperature, like 475°, for a baking sheet.)
- Boil water (and 1tsp salt) in as wide a pot as you can. Ideally you should be able to fit at least 3 bagels at a time in it. (Be smart about this, of course; if you can fit 4 but you’re making 6, you should still probably just do 3 at a time.)
- OPTIONAL, but recommended: Prepare an “ice water bath” in some other wide container by filling it with cold water and as much ice as you can. A casserole dish works well. Be sure to leave enough headroom for the bagels so it doesn’t overflow. (If you have room for it, you could refrigerate the water in the container the night before to make it as cold as possible.)
- OPTIONAL: Prepare an “egg wash” to help make your toppings stick, or if you just want the bagels to look shiny. Crack an egg white into a bowl and sprinkle in a little bit of water, then whisk it a bit. Also get out your favorite brush. Store the yolk somewhere or drink it like Rocky. Or include it in the egg wash, but it’s not really necessary. (Personally, I usually skip this step, since it’s one more allergen to worry about and I’ve not found it strictly necessary to make the toppings stick.)
- OPTIONAL: If you’re using toppings, you may want to prepare yet another vessel or work surface by sprinkling the toppings (i.e. Everything Bagel seasoning) on it.
- OPTIONAL: Once all of the above are done, give one bagel (your least favorite one) the “float test” by putting it in a bowl of water. (I usually use the container that the dough was mixed/risen in, since it’s not of much use at this point.) If it floats, you are ready to boil them. If it doesn’t, wait 10 minutes and try again. If it still doesn’t, you might just have to go for it, but say some prayers first.
- NOT OPTIONAL! Okay, let’s get back to business. When the water is boiling, leave it at high heat, and add 2 Tbsp malt syrup or non-diastatic malt powder. Then, slowly add 2 Tbsp baking soda. Seriously – be careful here. The baking soda should be added a spoonful at a time, and given a few seconds to dissolve (stir if necessary). If you add it all at once, you may get a baking soda volcano. This can get out of hand very quickly and you’ll have a foamy mess all over your stove, and probably inside your oven. The plus side is it’ll smell like bagels.
- Place bagels in the boiling water bath. Allow to boil for 30 seconds, then flip them over (using a spatula or a “spider”) and allow them to boil for an additional 30-60 seconds (stick closer to 30, but there’s always some staggering involved, and some game-day decisions to make).
- Remove bagels from boiling water bath and place them in the ice water bath.
- Repeat for remaining bagels.
- After the ice water bath, transfer the bagels to either your toppings prep area or some other dusted staging area. Or, if using a baking sheet lined with parchment paper (and possibly some spray oil), go ahead and place the bagels on that.
- If using a baking stone/steel, line it with a piece of parchment paper.
- Bake the bagels in the oven – either topping-side down or semolina-side down, as applicable – for about 8 minutes.
- Use a spatula to flip the bagels over and bake for about 8 more minutes.
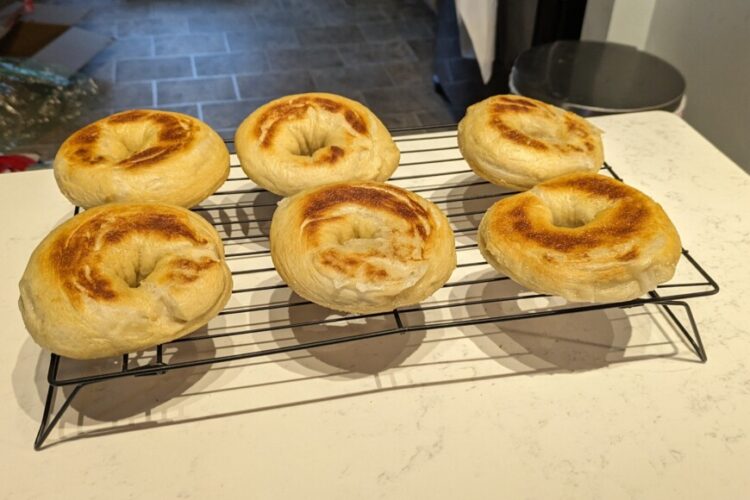
- Remove to a cooling rack if you’re confident that they’re done, or turn the oven off and let them rest (with the door open) for a bit longer.
- Allow them to cool as long as you possibly can (I know, you’re hungry).
- Eat them! I don’t really need to tell you how to do this, do I? (Well, I could, but I’m trying not to be a control freak.)


New York-style Bagels
Equipment
- 1 large pot
- 1 baking stone or steel optional
- 1 baking sheet
- 2-4 parchment paper sheets
- 1 proving bag optional
Ingredients
For the Sponge
- 170 g Water, room temperature ¾ cup
- 170 g Flour, high gluten content about 1½ cups
- ¼ tsp Yeast can be instant or active dry
For the Dough
- 170 g Water, room temperature ¾ cup
- 400 g Flour, high gluten content about 2½ cups
- ¾ tsp Yeast can be instant or active dry
- 8 g Diastatic Malt Powder 2 tsp
- 16 g Salt 2 tsp
For the Water Bath
- 3 Quarts Water approximately
- 1 tsp Salt
- 2 Tbsp Malt Syrup or Non-Diastatic Malt Powder
- 2 Tbsp Baking Soda
Optional
- Semolina Flour coarse ground, for dusting
- Toppings enough to sprinkle over a sheet
Instructions
Make the "Poolish" Sponge
- Combine yeast (¼ tsp) with water (170g) & flour (170g) in a container that's at least large enough for it to potentially double.
- Lightly cover the container, not air-tight.
- Let it sit at room temperature for about 8 hours.


Mix the Dough
- Add remaining water (170g), flour (400g), & yeast (¾ tsp) to the sponge, in a larger container or bowl of stand mixer if necessary. (Again, there should be room for it to double, just in case.)
- Stir briefly to incorporate yeast.
- Add malt powder (8g) and salt (16g).
- Combine all ingredients by hand or with a wooden spoon, dough whisk, or stand mixer.
- Knead vigorously until the dough is uniformly tacky, but not wet or sticky.
- Place dough ball in an air-tight container with enough room for doubling.
- Refrigerate overnight.
Shape the Bagels
- Remove dough from fridge and container.
- Dust a sheet of parchment paper with semolina or other flour.
- On a lightly floured work surface, cut dough into 6 even pieces.
- Roll a piece of dough into a rope about 3 hand widths long. Wrap it around your hand so that the ends overlap in your palm. Press down firmly with your palm and rock back and forth to merge the ends together.
- Remove the shaped dough onto the dusted parchment paper.
- Repeat with other dough pieces.
- Cover the shaped dough on the parchment paper with plastic or a damp towel. Allow to rest for 15-30 minutes.

Boil & Bake
- Pre-heat oven to 450° F, with a baking stone/steel inside if using.
- Fill a pot with cold water and 1 tsp salt. Bring to a boil.
- In another container, prepare a bath of cold water and ice. (Optional, but recommended.)
- OPTIONAL: Sprinkle toppings on a baking sheet, parchment sheet, or some other area.
- OPTIONAL: Prepare an egg wash by whisking 1 egg white with a few drops of water.
- "Float test" one bagel by placing it in water. If it floats, you are ready to boil them. If it doesn't, dust it with some flour and wait 5-10 more minutes. (Optional, but recommended.)
- Once water comes to a boil, leave the heat on, and add malt syrup or non-diastatic malt powder (2 Tbsp). Gradually add baking soda (2 Tbsp). (Be prepared to stir down the foam with your spatula or "spider".)
- Place the first 3 bagels in the boiling water bath. Let them boil for 30 seconds.
- Flip the bagels over (using a spatula or "spider") and allow to boil for an additional 30-60 seconds.
- Remove bagels to ice water bath.
- Repeat with remaining bagels.
- Transfer bagels from ice water to a dusted parchment paper, or wherever your toppings are. (If you're using an egg wash, you'll want to brush that on the bagels first, then place them egg-side down on the toppings.)
- Line baking surface with parchment paper.
- Transfer bagels to baking surface, either topping-side down or semolina-side down.
- Bake for about 8 minutes.
- Flip bagels over with a spatula and bake for an additional 8 minutes.
- Turn off the oven. As long as the bagels aren't burning, allow them to rest in the oven for a few more minutes with the door open.
- Remove to a cooling rack.

[…] is the second part of our article about bagels. Part 1 covered traditional, extremely-not-gluten-free New York bagels. Now we’re going to cover the […]