This article about pizza is going to be split into 2 parts. The first part is a departure from what this site usually covers: I’m going to talk about traditional, very allergy-unfriendly New York pizza, with plenty of gluten and cheese. But I knew I had to get that right before making the allergy-friendly version. See part 2 for that.

As Michael Scott once said, pizza is the great equalizer; everybody likes pizza. It’s also often said that there’s no such thing as truly bad pizza; even when it’s “bad”, it’s still pretty good. And yet there are also a seemingly endless amount of strong opinions about what qualifies as the best pizza.
Truthfully, I don’t think there’s any one answer as to the best kind of pizza. How could there be, when there are so many factors that each bring something different to the table? Brick oven. Steel oven. Wood-fired. Coal-fired. Thin crust. Sicilian. (And deep dish, I guess…) All of these can be good things, but you can’t possibly have them all at once.
But what I can say is that there’s a top tier of quality. And then there’s everything else.
I’m Italian on my father’s side and Swedish on my mother’s, but if I had to summarize the type of food I feel the strongest connection to, it would be “New York food”. It shares a fair bit of space on a Venn diagram with Italian food, but there’s a lot of other stuff in there too: Jewish, Polish, German, and more. But regardless of the actual culture of origin, “New York-style” is usually its own thing. And outside of bagels (more on that in a future post), few foods are more strongly identified with New York than pizza.
One of the things I was prepared to accept when I moved from New York to North Carolina was that if I wanted good pizza, I might have to make it myself. More on that in a minute, but I have found several local pizzerias that are very good. The main difference is that instead of having one on every block, there are maybe about 5 within a ten-minute drive of each other. And out of those, 2 or 3 will be “New York style” and the others will be holdovers from when you couldn’t Google how to make pizza. But truthfully, you can make pizza correctly or incorrectly anywhere.


Now, there’s been a long-standing myth that New York pizza is better because of the water. This legend has been reinforced by ex-Yankee pizza & bagel shop owners that boast about daily shipments of NY water. Maybe they actually believe the hype, or maybe they just know it’s what people want to hear; I’m not going to throw shade either way. But I do disagree. Part of that is wishful thinking, part of it is simple skepticism, and part of it is that I just see too many other plausible explanations. Because there are so many other key elements of NY-style pizza that people get wrong. The type of water used in the dough is the least of these concerns, if it even makes the list at all.
In my opinion, here are the most important things about traditional NY-style pizza that people tend to get wrong. Or at least, they’re the things that surprised me when I was learning how to make pizza, so I’m assuming other people might not have thought about them either. (I’m mostly talking about “regular” pizza here; obviously other styles like Margherita will differ significantly on a few points.)
- Not just mozzarella cheese.
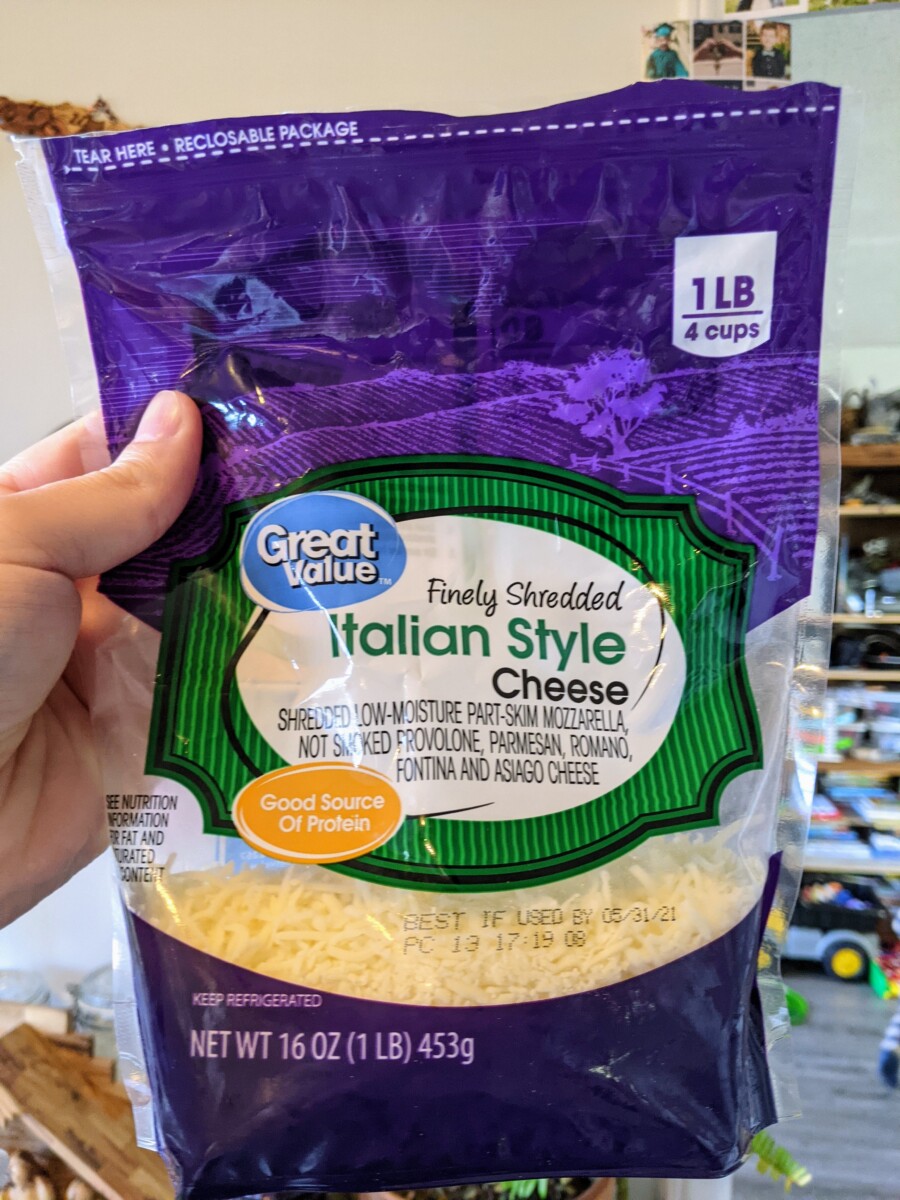
At the very least you also need shredded parmesan, if not others such as romano, fontina, etc. That might sound bougie, but it’s actually really easy to find bags of shredded “italian blend” (or even “pizza blend”) cheese in most grocery stores. You just have to be looking for it. But mozzarella alone is just not going to give you that nice salty flavor.
- Not just any tomato sauce.
Pizza sauce isn’t exactly the same thing as marinara or pasta sauce. It’s not too different, but it needs to pack a bit more concentrated flavor, since you’re using a relatively thin layer of it. You should ideally either buy something specifically called pizza sauce or just make your own. It’s actually really easy, so there’s no reason not to do it right; I use a no-cook recipe, which you can find below. It simply uses canned crushed tomatoes and a handful of dried spices you probably already have in your pantry. - Garlic, basil, and oregano.
These are just a few of the spices that need to go into the sauce, but they’re the most crucial ones. I mean, this should really be obvious if we’re talking about Italian food at all — how could it not have these? But I’m convinced some places either leave it out or just don’t use nearly enough of it. (Oregano, in particular, is so closely associated with pizza that my son now exclaims “Pizza!” any time we season anything with it.) - High heat.
Believe the hype about pizza stones; they’re not a gimmick. You can’t bake pizza like a casserole. It just doesn’t work. For such a thin dough with such wet toppings, you need the crust to get crispy real quick. Recently, I’ve discovered the greatness of a baking steel, which is perhaps even better than a stone. It costs a little more, but it’ll basically never break, and the heat distribution seems more reliable. (Trust me, I’ve gone through several pizza stones despite following all of the recommendations about proper care and pre-heating. Steel is just better.) - Olive oil.
I use it both in the dough and on top. Some very reputable sources don’t use it in the dough, so I’ll reserve judgment on that, but brushing it on top seems sensible to me. Not only does it add flavor and color, but it’s also sort of a protective layer to keep the sauce from absorbing directly into the dough. This certainly could vary depending on what else you’re topping it with, but at the very least it’s always worth asking the question, “Should I use olive oil on this pizza?” - Long-risen, high-protein dough.
This was the last piece of the puzzle for me. Using bread flour instead of all-purpose was the first logical step, since pizza is essentially a type of flatbread. Later I learned that “00” flour is even better; it’s got a high protein content like bread flour, but it’s finer ground and has less of that gluten stretchiness which can be kind of a pain when shaping pizza. However, the real treat is letting the dough rise for a long time: 24 hours at room temperature + more in the fridge, or you can keep it exclusively in the fridge for even longer. That extra bit of fermented flavor and bubbly crust really take things to the next level. To be honest, you can still get 95% of the way to great pizza without doing this, but it’s not that hard — in some ways it’s kind of easier — so why not?


My standard pizza recipe pulls from a few different sources:
I started out using that first “no-rise” recipe for the dough, then gradually shifted all the way to the opposite extreme, the cold ferment method. But where their recipe makes a huge batch (7 pies’ worth) I scaled it down to 2. As for the sauce, while I wouldn’t disbelieve anyone who claims they prefer cooking it, I’ve personally seen no reason not to do it the fast way.
Now, I’m assuming you have a normal-sized home oven, which will not be able to make a pizza as large as what I’d traditionally expect from a NY pizzeria. It’s simply not big enough. But if you do have a big, dedicated pizza oven, I’m sure you can figure out how to scale the recipe to match. If you end up with too much, just make a second tiny pizza or something — it’s not like you’ll be able to buy exactly the right amount of toppings anyway, so there’s really no pressure here.
Ingredients (for 2 pies)
THE SAUCE
- 28oz Crushed Tomatoes (1 big can or 2 small cans)
- 2 tsp Basil (dried & crushed)
- 2 tsp Oregano (dried & crushed)
- 2 tsp Garlic Salt (or, ½ tsp Garlic + 1½ tsp Salt)
- 1 tsp Paprika
- 1 tsp Sugar
- ½ tsp Onion Powder
- ½ tsp Ground Black Pepper
THE DOUGH
- 400g Flour (2½ cups) + more for dusting – preferably ‘00’ or bread flour
- 1 cup Water (room temperature unless doing quick ferment)
- ¼ tsp Yeast (active dry)
- 1 ½ tsp Salt (table salt)
- 2 Tbsp Olive Oil
NOTE: If you’re doing the quick rise instead, make the following adjustments:
- use warm water (110° F at most)
- add 2 Tbsp Sugar
- use 2¼ tsp Yeast (i.e. the amount in a standard yeast packet)
TOPPINGS
- Olive Oil
- Garlic (crushed or minced) – around 1-2 cloves per pie, depending on size
- Shredded Cheese (Italian blend including Mozzarella & Parmesan at the very least ) — about 1½ cup per pie
OPTIONAL
- Coarse Semolina Flour or Cornmeal (for dusting the pizza peel or other prep surface)
Instructions


Making the Dough
There are a few different methods for making the dough, depending on how long you want to / are able to let it ferment. The good news is that unlike making a loaf of bread, you barely have to worry about things like “overproofing” since it is shaped immediately before baking. Regardless, step 1 is basically always the same: mix all of the dough ingredients together. If you’re doing a faster rise, you’ll need a little more yeast and possibly some sugar (see ingredient list) and you’ll probably also want to knead it. Otherwise, you can basically just lightly mix it until it comes together, with no obvious dry or wet spots.
(As always when mixing dough, you’ll want to keep the yeast separate from the salt as long as possible; and if it’s active dry yeast, you’ll want to activate it in water first.)
After the dough is mixed together, cover it. Then, you basically have 3 options:
- Let it sit for a few hours, until you’re ready to use it
- Let it sit at room temperature for 24 hours, then divide into separate containers in the fridge for up to 3 days
- Throw the whole thing in the fridge and let it sit for 3 to 7 days, then divide into separate containers when removing from fridge
Either way, you’ll want to let the dough balls sit for a while at room temperature (up to 5 hours) before making the pizza.
In the meantime, let’s move on to the sauce.

Making the Sauce
Mix all sauce ingredients together in a bowl. Then cover and refrigerate. That’s it!
While you wait…
In addition to the sauce, refrigerate any toppings (especially the cheese) as long as possible.
Pre-heat the oven, with the pizza stone/steel inside, to the highest heat it will allow. (Mine goes up to 550° F. I’m assuming yours doesn’t go much higher.) Ideally, you will want it to be fully heated for at least 30 minutes before you actually put the pizza inside. This is especially critical if you’re using stone rather than steel, because a quick change in temperature could cause the stone to break. But even with steel, allowing a full pre-heat just gives better results.

Shaping the Dough
Remove each dough ball from its container, dusting with flour as needed, and rest it on a dusted countertop for a few minutes.
Prepare your work surface; ideally a pizza peel, otherwise parchment paper or something similar. Dust it generously with flour and optionally some coarse ground semolina flour or corn meal. Make sure this surface is prepared before you stretch the dough!
Stretch the dough. There are several techniques for doing this, but ultimately your goal is to create a flat disc as large as possible with uniform thickness — but without knocking all the air out. My process is as follows:
- Dust the dough ball with flour (once to start, and again during each step as needed).
- Pat it gently with your fingers around the circumference, then move to the center, and repeat as needed. Do this as much as you can until it’s not really possible to flatten it any further without squeezing the air out. It should become more disc-shaped, but still pretty thick and puffy.
- Place the dough disc on top of the knuckles of both hands. (Ideally, you want to be making fists with both hands opposite each other, thumbs facing inward.) Gently pull the dough apart with your knuckles to stretch it in one direction, then rotate it a little and repeat, going all the way around the circle as evenly as possible. Flip and repeat as many times as necessary until you either can’t stretch it further without tearing it, or it’s as big as your work surface will allow.
- Finally, place it on the dusted work surface.
There are probably other dough-stretching techniques. Figure out what works for you. However, I can tell you a few things not to do:
- Do not try to form a thicker ring along the outside of the dough. That’s not how crust is formed. (The crust will form naturally during baking; you just leave a little bit of space around the outside without any toppings.)
- Do not use a rolling pin. That’ll knock out all the air, and you’ll end up with a giant Italian cracker.
- Tossing the dough in the air isn’t a thing. Don’t do it unless you’re being paid to. It’s about as helpful as throwing your knife in the air while cutting vegetables.
- Obviously you want to avoid tearing a hole in the dough at all costs. But if that does happen, all is not necessarily lost. Just put the dough down, take a few deep breaths, fold a little dough flap over the hole, and keep trying. Chances are it’ll probably still turn out pretty good.


Assembling the Pizza
Remember: thin layers! If the pizza is too “loaded” it’s gonna be hard to slide it into the oven. The ideal amount of each of these toppings is probably slightly less than you’d expect. It’s all about distributing the ingredients over a wide surface area, packing flavor into each bite.
- Olive Oil – Spread a thin layer of olive oil across the top of the dough. (I like using a silicone pastry brush, but you could use a spray bottle, or even your fingers.)
- Garlic, Salt & Pepper (optional) – Distribute a modest amount of crushed garlic, as evenly as possible, across the dough. A little bit of salt & pepper can be nice here too. Just remember that these same spices are also in the sauce, so go easy. (It takes a lot to convince me to go easy on the garlic, but I have definitely been guilty of overdoing it here. You don’t want the pizza to just taste like garlic. You could probably even omit this step altogether, but it makes me feel fancy.)
- Sauce – Add sauce, one ladle-full at a time. (And remember again: keep it thin. It’ll spread out on its own, so you don’t need to cover every square inch with red. This ain’t Sherwin-Williams.)
- Toppings (part 1) – If you’re using any toppings other than cheese, add some of them at this stage, before the cheese. The cheese will help them stay on. (I would say to add no more than half at this point, but really it’s probably just a matter of preference and depends on exactly what topping you’re using. Figure out what works best for you.)
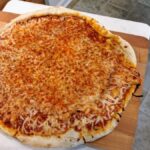
- Cheese – Sprinkle the cheese evenly across the pie.
- Toppings (part 2) – Add your final layer of toppings, if needed.

Baking the Pizza
We’ve finally arrived at this, the final step – but also in some ways the most stressful. It takes practice to get this right, and I still usually mess it up at least a little bit. I’m going to do my best to describe the process of using a pizza peel, because I wouldn’t recommend any other way.
- With the pizza assembled on the peel, open your oven and hold the peel over the baking surface (stone, steel, etc.). In other words, the furthest edge of the peel (opposite the handle where you’re holding it) will be hovering over the furthest edge of the baking surface (back of the oven).
- Gently angle the peel downward so that the rear edge touches the baking surface.
- Gently “shimmy” the peel from side to side until the pizza appears to be loosening from the surface. Ideally, it will slide forward (since you’re also angling the peel downward).
- Once the rear edge of the pizza lands on the baking surface, you’re almost home. Briskly and smoothly slide the peel back out of the oven. The rest of the pizza should now also be stuck onto the baking surface, ready to cook. (If it isn’t, I have no further advice. Sorry.)
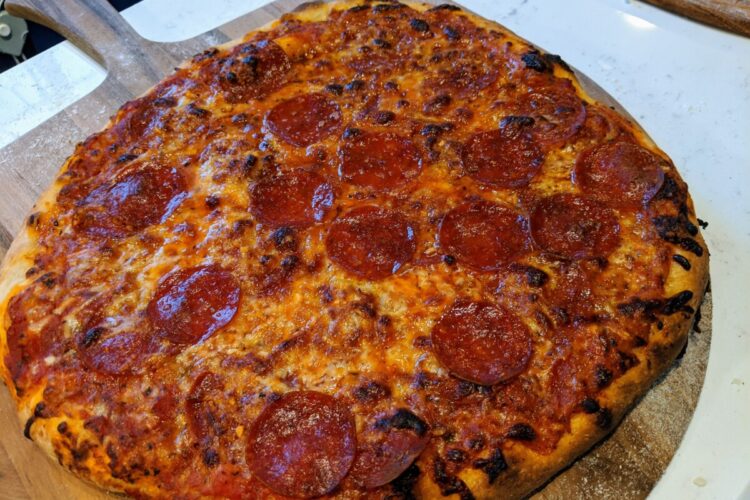
- Bake for an amount of time that you will really just have to figure out for yourself. On my oven, at 550° F, it usually takes no longer than 10 minutes. I generally check around 7. What you’re looking for is browned spots evenly distributed across the cheese.
- When it’s finished, you should be able to fairly easily (easier than getting it in there, at least) slide the peel under the pizza and lift it out of the oven. The only thing to look out for here is if there are any parts where the cheese is sticking to the baking surface around the edges; you might need to slide the peel around a little to loosen that. (Also, sometimes the peel accidentally pushes the pizza further to the back of the oven as I’m trying to slide it under. You may want to keep a spatula nearby if you need something to hold the back of the pizza in place.)
And that’s it! You’ll probably also want to let the pizza cool off and set for a few minutes before slicing. Other than that, you know what to do.

Soon we’ll be back with part 2, where we make our best attempt to replicate this process without wheat or cheese. It’s not easy, but it’s possible!
New York-style Pizza
Equipment
- 1 Baking Steel or Stone (Steel is better if you can get it.)
- 1-2 Pizza Peels (Having 2 will make it much easier to prepare the second one while the first one is cooking.)
Ingredients
Sauce (makes a bit more than you need)
- 28 oz Crushed Tomatoes
- 2 tsp Basil dried & crushed
- 2 tsp Oregano dried & crushed
- 2 tsp Garlic Salt or, ½ tsp Garlic + 1½ tsp Salt
- 1 tsp Paprika
- 1 tsp Sugar
- ½ tsp Onion Powder
- ½ tsp Black Pepper ground
Dough
- 400 g Flour 2½ cups – Italian '00' style is best, otherwise bread flour, otherwise all-purpose will still work decently in a pinch
- 1 cup Water room temperature for long ferment, warm for quick ferment
- ¼ tsp Yeast can be instant or active dry; add 2tsp if doing quick rise
- 1½ tsp Salt table salt
- 2 Tbsp Olive Oil optional
(Only if doing quick rise)
- 2 Tbsp Sugar
Toppings
- 3 cups Shredded Italian Cheese must contain at least mozzarella & parmesan
- Olive Oil brushed
- 2-4 cloves Garlic minced or crushed
Other
- Semolina Flour or Cornmeal for dusting
- Flour for dusting
Instructions
Dough – Bulk Ferment
- If necessary, activate yeast in water. (This is if you're using active dry yeast instead of instant.)
- Combine the dough ingredients in a bowl or other container. Stir just enough to combine, with no dry flour remaining.
- Cover the bowl/container and either:– place it in the refrigerator immediately (if doing 3-7 day ferment), or…– let it sit for 24 hours, then separate into 2 smaller containers and refrigerate for up to 3 days
Sauce
- Combine all sauce ingredients in a small bowl. Cover and refrigerate.
Pizza Assembly & Baking
- If doing the longest bulk ferment, remove the large dough container from the refrigerator and separate it into 2 dough balls, then place them in 2 separate containers (oiled and sealed). Let them sit at room temperature for up to 5 hours.
- Pre-heat oven to its highest possible heat, with the baking steel or stone inside. Allow for at least a half hour at full heat before adding the pizza.
- Dust countertop and pizza peels with flour. Additionally, dust pizza peels generously with semolina flour or cornmeal.
- Remove dough balls from containers and allow them to rest on the counter for about 10 minutes.
- Take one dough ball and pat it gently into a disc/puck shape. Continue to stretch it on the tops of your fists, gradually, until it is as large as possible without tearing or exceeding the size of your pizza peel. Place it on the peel.
- Brush a thin layer of olive oil on the shaped dough.
- (OPTIONAL: Add a sprinkling of crushed garlic, salt & pepper.)
- Ladle some sauce onto the dough and spread it into a thin layer.
- (OPTIONAL: Evenly distribute about half of any non-cheese toppings you're using.)
- Sprinkle cheese onto the dough.
- (OPTIONAL: Add the remaining toppings.)
- Using the peel, slide the assembled pizza into the oven.
- Cook in the oven for roughly 7-10 minutes. Check frequently for doneness. The cheese should be not yet burned, but noticeably browning in many spots.
- Use the peel to slide the pizza out of the oven. Remove to a cutting board. Let it sit for a few minutes, then slice and serve.
- Repeat the above steps for the second pizza. (If you have 2 peels, you can start the second one at whatever time works best for you. Otherwise, wipe away any cheese/sauce/oil and re-dust your peel to do the second one.)
[…] sauce recipe is identical to the one from my New York-style pizza recipe (which in turn is taken from here). There are no allergens in it, so there’s no need to change […]
[…] like with pizza, even in NY, there’s a big quality gap between chain/grocery store bagels and “bagel place” […]