Using King Arthur’s Gluten Free Classic Yellow Cake Mix
When I was young and single, one of the things I used to look forward to being able to do for my kids was baking customized birthday cakes. My mother used to make elaborate cakes for me and my siblings each year for our birthdays. She’s not a baker, but like her daughter after her, she’s a pro at reading cake box instructions. (Her personal touch was swapping out the oil in the instructions for butter, and elaborately decorating it with homemade buttercream frosting.) I still remember getting a pink carousel horse cake for my fifth birthday at Hot Skates on Long Island, NY. My brother, who shares my birthday month, got a Michelangelo cake (of TMNT, not Sistine Chapel, fame). And another year, my sister got a princess cake, consisting of an edible pink ruffled dress and a plastic doll from bodice to head.
That’s one of the many reasons I was heartbroken when our son was diagnosed with his allergies at 10 months old. Wheat, eggs, and milk (among other allergens) were now off the menu. I remember lamenting to a fellow church member, crying that my baby wouldn’t even get to have a 1-year-old birthday cake. Since then, however, we’ve learned a few things. First, there are quite a few companies, including Pillsbury and King Arthur Baking, that make gluten-free cake mixes. Second, those cake mixes usually require vegetable oil instead of butter anyway, and the eggs can easily be replaced with applesauce. (Quick tip: use ¼ cup of applesauce per egg, and take the added moisture into account when baking. For our oven, we add about 10 minutes to the max bake time, and check for doneness with a toothpick.)
So after learning about these options, all our birthdays have become allergy-friendly. For each of my boys (even my oldest who doesn’t have allergies), we make gluten-free, egg-free, dairy-free cakes and/or cupcakes. I’ve managed a Black Panther cake, a beach scene cake, and dozens of cupcakes. For friends’ parties, we bring our littles their own special cupcakes so they can join in on the festivities.


I particularly love King Arthur Baking Company’s Gluten-Free Cake Mixes. The chocolate mix is especially delicious. Using that sponge with homemade vanilla vegan buttercream, vegan whipping cream, and cherries, I’ve made a decadent Black Forest Cake. I have had people who didn’t know that the chocolate cake was gluten free and vegan tell me that it tastes just as good as the original versions.
However, one thing we’ve noticed with allergy-free baking is that chocolate covers a multitude of sins. As such, King Arthur’s plain yellow cake mix is not my favorite on its own. Naturally, the kids always love the icing, so they’ve never had any complaints anyway. But I still like finding ways to spice it up. For Ben’s October birthday, I made him a pumpkin cake shaped like a dog. (Somebody gave us a Blue’s Clues cake mold, so I just rolled with it.) And this past year for Christmas, I wanted to take it to the next level.
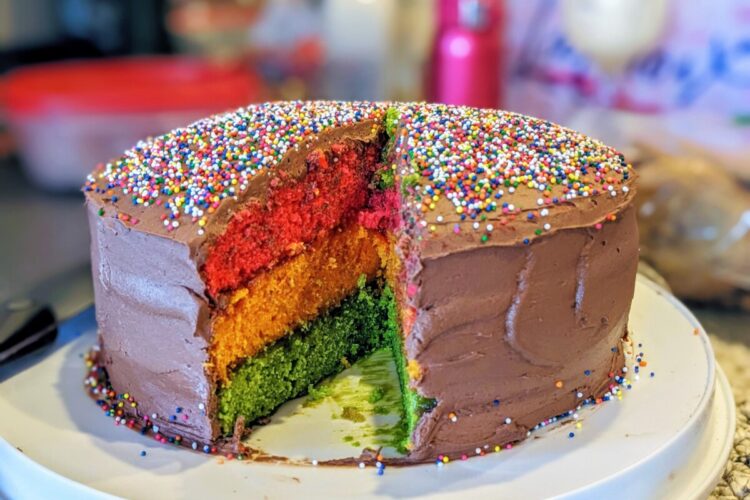
Growing up in New York, my parents regularly bought assorted cookies from the local Italian bakery. One of my favorites was the rainbow cookie. It’s actually a petit four made of three layers of green, yellow, and red almond sponge cake, separated by a thin layer of raspberry jam and covered in chocolate. So I decided that this year for Noche Buena I would make a Rainbow Cookie Cake, with an almond-flavored sponge and raspberry jam, and using a vegan chocolate buttercream frosting.


This is just one example of what you can do with King Arthur’s Gluten-Free Classic Yellow Cake Mix. But it’s one I’m particularly proud of. So I’m going to share the recipe with you, along with some things I’ve learned about how to get the most out of this mix.
You’ll need more than one box of cake mix to make the 3-layer cake. I made 2 layers out of each box (4 total). You only need 3, but you can use the extra to taste-test and/or throw pieces at the ravenous children to keep them at bay. You’ll also need at least two 8″ cake tins.
For my modified version of the recipe, you can jump to the bottom of the page. But to show you how I got there, I’m going to walk through King Arthur’s directions and how I modified them.
Jump to Recipe1. PREHEAT oven to 350°F. Lightly grease bottoms (but not sides) of cake pan(s)…
Here, we greased the bottom of the pan using a spritz of cooking oil, but then put a circular piece of parchment paper at the bottom of the pan. I’ve seen people do this fancy bit of geometry where they fold the paper into triangles before cutting and somehow make a circular piece to fit in the pan. Call me a novice baker, but I just trace a circle using my cake pan as my stencil and then cut it out.
2. BEAT butter and oil together using electric mixer, then blend in half of mix. At low speed, mix in eggs one at a time. Stir in half of the milk, the remaining mix, and then the remaining milk. Pour batter into pan(s) of choice . . .
Here, we start with our substitutions. As a rainbow cookie’s sponge is almond flavored, we substitute almond milk for regular milk 1:1. (Almond milk is usually a good milk substitute in general, but for an almond-flavored cake it’s a no-brainer.) Instead of four eggs, we use one cup of unsweetened applesauce. We also added a teaspoon of almond extract and 3.5 oz of Odense Gluten Free Almond Paste (half of the 7 oz package). (Special note: if your almond paste is hard, but not expired, I suggest breaking it up in your food processor and microwaving it about 10 seconds at a time for the paste to soften enough to incorporate into the cake batter.)
Because of how much liquid this cake has, we add all the wet ingredients together, then throw in the dry and start mixing. Since gluten free sponges aren’t as temperamental as regular cake (remember, no eggs), I don’t worry about over mixing. (I’m sure anyone with allergies can agree we have quite enough to worry about already!) I just stop when all the mixture is incorporated.
Once we have our batches of cake mix, we put half of each batch of batter in its own mixing bowl and add the food coloring. Red in one, green in another, and yellow in a third. Remember to start slow with your food dye. I went a little overboard with my yellow and my sponge looked more orange. C’est la vie. It still tasted good.
3. BAKE as directed in chart, until toothpick inserted into center comes out clean and top springs back when lightly pressed. Cool in pan(s) for 10 minutes before turning out onto rack to cool completely.
Again, here we add about 10 minutes to the max cooking time, but check occasionally until a toothpick comes out sans batter.
Now, once the cakes are completely cooled, we start assembly. Green layer goes on the bottom. Then start adding about a tablespoon of raspberry jam at a time and spread it over the top of the layer until evenly distributed. Try not to put too thick of a layer of jam, or it’ll squeeze out the edges once you put the next layer on. It’s a thin layer of jam, about a ¼ inch.
Add the yellow layer. Spread a thin layer of jam. Add the final layer, the red layer.
Once the cake is assembled, it’s time to frost.
For our vegan chocolate buttercream, we use this Vegan Chocolate Frosting recipe from Nora Cooks found here https://www.noracooks.com/vegan-chocolate-frosting/, but we substitute plain almond milk for soy milk (only because we usually have almond milk on hand whereas we don’t really drink soy).
Frost your cake. I used all of the frosting the above recipe yielded, slathering it on with wild abandon then smoothing it down and sprinkling the top with rainbow sprinkles.
While I do have plans to one day attempt to make a gluten free, vegan version of the classic petit four rainbow cookie, for now, this beautiful and delicious rainbow cookie cake was a smash even for our harshest critics. Hope you enjoy, and please let us know how it went for you!

Rainbow Cookie Cake
Equipment
- 1 hand or stand mixer
- 2+ mixing bowls In order to be able to work on at least 2 layers of cake at any given time (2 halves of 1 cake mix), you'll definitely need at least 2 mixing bowls. The more the merrier; in total, there are 5 separate mixes here, but mainly 2 simultaneous ones.
Ingredients
For Cake
- 2 boxes King Arthur Flour Gluten Free Classic Yellow cake mix
- 2 cups Applesauce separated
- 2 sticks Vegan Butter softened and separated (We like Country Crock’s Plant Butter with Olive Oil)
- 1⅓ cup Almond milk, unsweetened & unflavored separated
- 7 oz Almond Paste Odense Gluten-Free
- 1 tsp Almond Extract
- ½ cup Raspberry Jelly
- Yellow, Red, and Green Food Dye
- Rainbow Sprinkles
For Chocolate Buttercream (see linked recipe from Nora Cooks)
- 2 sticks Vegan Butter softened
- ¾ cup Cocoa Powder unsweet, Dutch processed
- 420 g Powdered Sugar (3½ cups)
- 2 tsp Vanilla Extract
- 3 Tbsp Non-dairy unsweetened milk
Instructions
- Preheat oven to 350°F. Lightly grease bottoms of two 8” circular baking pans. Line with parchment paper.
First 2 layers (1 box of cake mix)
- Prepare first box of cake mix. Beat butter, milk, and applesauce together using an electric mixer. Add in 1 tsp of almond extract and 3.5 oz of soft almond paste.
- Add in cake mix and beat until fully incorporated.
- Pour half of batter into one mixing bowl and half into another mixing bowl.
- Adding a few drops at a time, add the red food dye to one batter, then stir until incorporated throughout.
- Adding a few drops at a time, add the green food dye to the other batter, then stir until incorporated throughout.
- Pour one batter into one prepared cake pan, and pour the other batter into the other prepared cake pan.
- Bake for 35-45 minutes, checking frequently after 35 minutes until a toothpick comes out clean.
- Cool in pans for 10 minutes before turning out onto rack to cool completely.
Final + extra layer (2nd box of cake mix)
- Repeat the above cake preparation to make a yellow layer and an extra, uncolored layer (not used in cake).
Once all layers are completely cool, assemble as follows:
- Bottom layer: Green Sponge
- Spread ¼ inch layer of raspberry jelly over the top of the green layer.
- Middle layer: Yellow Sponge
- Spread ¼ inch layer of raspberry jelly over the top of the green layer
- Top layer: Red Sponge
- Frost the assembled layers with vegan chocolate buttercream, and sprinkle with rainbow sprinkles.
Recent Comments